AVENUE OF THE GIANTS


Location: Avenue of the Giants, Founders Grove Trial -- Outside Redway, CA
Date/Time:  Monday 3/14/11 -- afternoon


 Location: Patricks Point State Park, Wedding Rock & Trail
Date/Time:  Tuesday  3/15/11 -- afternoon

My #1 Must Have!!!

I recently ordered a lenspen from amazon and it arrived this past weekend. Up until I got this item I have been cleaning my lenses and such with a microfiber cloth- eeeek!!! It worked okay but i was starting to notice that it was just moving the dirt around the lens and creating tiny scratches- enter the lenspen!! 

This thing is AMAZING!!! It was only like $6 on amazon.com (they have them at Swanlunds if you wanna go local but its around $20 there) and arrived within a week of placing the order. Looks fancy huh? Well, its not really but let me tell you how it works:

Step 1- that brush on the end is retractable into the barrel- simply push it out and wipe all your glass
Step 2- the other end is a microfiber covered suction cup (oooh yeah!!) after the brush clears the dirt use this in small circular motions to clean your smudges... 
Step 3- VOILA!! Clean, clear, and gorgeous lenses free of all dust, oils and particles!!

At only $6 this thing is a life (& lens) saver!!! 

Design Work

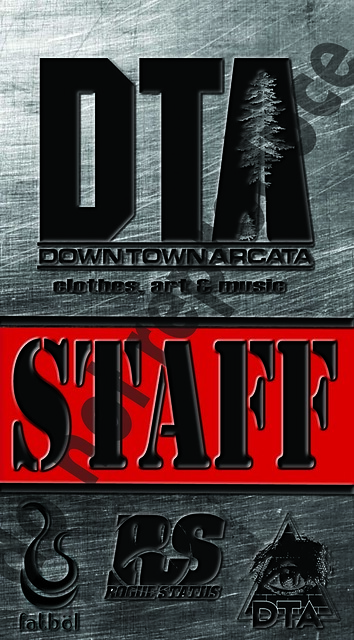
We have now hosted 5 arts arcata events since we have been open. These events are great and we have been getting a larger and larger turnout for them every time. This is great and all but it does lead to more problems like stolen merchandise, plastic cups littering the road, and gaggles of people in the stock room smoking out (most of whom I have never seen before). So I decided it's time to crack down (especially since the upcoming arts arcata is somewhat of a sensitive matter- local graff artists I'm sure the pd will be interested in).

It took me a while to think about how to go about this & it finally just hit me- pow- right in the kisser (not really, but I almost never get to say that!). BACKSTAGE/VIP PASSES!!! Dooi- how could I not have thought about that for 2 whole weeks? So I googled the dimensions (2.6x4.7) and went to work in Photoshop.

I knew that the passes had to have the store name & logo along with our clothing lines logo's but that was just the easy part... The pass started off saying MEMBER but I thought that would just encourage the idea that we are a dispensary (FYI- we are not!) so I changed it to STAFF. I also knew that I wanted red on the pass so I picked a red as close to our T-shirts as possible.

The background was the final step. I played around with solid color background but they just didn't give me the pop/professional look I wanted. So I started working with pics I normally use for textures & was going to layer the textures with a solid background. Once I tried a metal countertop image the deal was sealed.

The passes were starting to look like large dog tags- Not my intention but still pretty cool! However the text and logo's still looked flat and dull. Suddenly I remembered my Photoshop video's and thought of the layer properties box. I started playing around with the embossing feature and settled with pillow embossing. I was amazed- it was just what the passes needed & the logo's and text stood out like it had been stamped on the metal. They are being printed and laminated as I type this.

Pretty good for my first try at actually designing something pro-fession-al looking, although I'm sure in about 6 months I'll look back at them and go- "ew- what was I thinking, that is so amataur looking" but for now I LOVE them!!

I went in and added a "do not duplicate" watermark on the one I was posting online so that it couldn't be downloaded and printed by just anyone... Now I just have to find about 10-20 black cheapo lanyards & we are in biz-nazz...

DTA STAFF PASS

Experimenting with Motion Blur

I have been seeing a ton of motion blur images on flickr lately & decided to give the technique a try. I didn't expect much considering I had never tried this before and my hands are anything but steady however after looking through the images I was fairly surprised. 

What is Motion Blur? According to Wikipedia Motion blur is the apparent streaking of rapidly moving objects in a still image or a sequence of images such as a movie or animation. It results when the image being recorded changes during the recording of a single frame, either due to rapid movement or long exposure. (click on this posts title to link to a great DPS tutorial on this technique).

What did I do? First off, I had to find a subject, which is not all that easy in an office setting! I saw my new valentines orchid on my way back into my office and thought that would be the perfect subject- I really wanted a pic of the orchid but I have orchid pics & wanted something unique and different this time. I set my camera to manual (because I also wanted to see what bokeh my lens would get at f/11- the supposed perfect aperature) & played with the times as I went... 


f/11 @ 1.3 seconds

This one was one of my first tries... Not very pretty to look at, it's just generally blurry as my hands were a bit shaky and moving up/down/left/right... So I tried to steady myself on the edge of my chair and decided to try short tight movements to the side instead...


f/11 @ 1.3 seconds

Getting there- I really like the dreaminess of the flower in this photo but I wanted it to be a little more defined also (how's that for an oxymoron?). My hands were getting steadier though- evidenced by the lines going to the right (pretty straight huh?) So I decided to try holding the camera still for a brief second, then panning to the right & shortened my shutter speed to 1/2 a second just to see what I came up with... 


f/11 @ 1/2 second

This one is just okay... I definitely got the flowers to be more defined but I lost quite a bit of detail in them as well due to the amount of motion blur. My hands are getting steadier and steadier but I just panned too much in this. Plus the background had too much going on with the file cabinet off to the left... 


f/11 @ .8 seconds

This one is a hot mess... Increasing the shutter speed to .8 seconds instead of .5 did not seem the way to go...   Add that to the fact that my hands/arms were getting kinda shaky & tired = a hot mess of blur. So I tried going back to my beginning settings and lowered them just a tad (from 1.3 sec. to 1 sec.)...


f/11 @ 1 second

FINALLY!! I got exactly what I wanted!! The perfect amount of blur, detail, bokeh, and dreaminess. I tried to hold my hands very still for this image and probably went through at least 10 before this one which were almost perfect but some were a little too blurry or too solid or had too much motion. I just stuck with it and knew that it would work once my hands relaxed and I had time to practice... I went into Camera Raw & edited this image, mostly working on the white balance as the fluorescents made everything kinda crazy looking.  I also added a white border around this image.... 


I am definitely going be to be trying motion blur more and more using different subjects. There's just something fun and slightly exciting about breaking a rule I almost live by when photographic things (ie NEVER move the camera)!!!


Location: My office- Eureka, CA
Date/Time: 2/25/11 @ lunch
Subject(s): Orchid- Motion Blur
Notes: handheld-- panning left in some images & right in others-- edited in Camera Raw

The Pioneer Woman Actions

Who doesn't LOVE actions for photoshop?!! I recently downloaded The Pioneer Woman's action sets (1 & 2) from her blog (for link click on title to this post) and started playing around with them. All I can say is WOW~! Her actions are spot on- the seventies action reminded me of my family's old pics & the vintage action actually makes the image look like it really was taken with an old camera.

What is an action? Basically, it's a saved file for Photoshop which contains multiple editing steps- these are different for each action depending on the look the action is going for. So if I like alot my photos to be sharpened +10 and lightened +5 I can set up Photoshop to record the steps I take to get that and then it compresses it all into one file, saved in my actions tab. This file can then be used on any image with just one click, instead of having to adjust sharpness and lightness individually for each image. BRILLIANT!! It saves me time and quite a bit of hassle. Even better is that after each action finishes it shows up as a layer (or depending on the action multiple layers) which can then be further adjusted (ie opacity, fill, or blending mode, just to name a few) to make the image pop. You can save your own actions or you can download them from the net. These Pioneer Woman actions are the best I have come across yet & I was thoroughly impressed- she should be charging for these!!

If you use photoshop I would highly recommend taking a look at her site in general- topics range from momhood to cooking to photography. She has some great tips and tutorials in addition to her rockin actions...


ORIGINAL IMAGE #1 (the famous Carson Mansion in Eureka, CA-- built 1884-1886):


THE PIONEER WOMAN ACTION'S ON IMAGE #1:


Action Used: SEVENTIES


Action Used: DIM THE LIGHTS with OLD WEST


Action Used: VINTAGE


Action Used: LOVELY & ETHEREAL with SOFT & FADED (deleted light layer)


ORIGINAL IMAGE #2 (my lovely friend and model for the day)


MY OLD EDIT OF IMAGE #2:


THE PIONEER WOMAN ACTION'S ON IMAGE #2:


Action Used:  VINTAGE


Action Used: QUICK EDGE BURN with BOOST


Action Used: HEARTLAND


I said they were amazing actions (& free to boot!)- was I right or what??!!

Followers