Atlanta: Scout it Out...

Georgia on my mind.... 

I am getting ready to go back home to visit family & friends in a few weeks- YAY!!! So I decided to look through my pics from the last visit & was horrified to see I only took 20 pics the entire week and a half we were there!! How did that happen? I have maybe four or five nice shots of family but everything else was crap... 
Not this time around!
I decided to scout out a few locations- don't laugh, just b/c I'm from the land of peaches & cream doesn't mean I can't act like a tourist when I want! I am scouring the net, mostly Flickr & Panoramio to find locations that I wouldn't  normally think of or that I have no idea even exists. Atlanta is a big place, and I only lived in the city proper for 4 years, hardly long enough to know it all! 

LOCATIONS
1. The Swan House -- Buckhead 130 W. Paces Ferry-- Gorgeous italian style mansion & gardens
           Ideal Subjects: architecture, english gardens, history, perspectives, HDR, fall plants & leaves
"Croquet, Anyone" by Atlanta History Center
http://www.flickr.com/photos/atlantahistorycenter/4721084238/

2. Piedmont Park -- Midtown Atlanta -- never bothered to take pics here for some reason- it has a sweet view!
          Ideal Subjects: skyline, night skyline, HDR, landscapes
"Midtown From Piedmont Park" by Adam Preble
http://www.flickr.com/photos/preble/59079707/ 
3. Old Town Griffin -- Subjects: architecture, buildings, HDR, 

4. Sundial/Westin -- Downtown Atlanta -- $5 gets u to the top of the Westin for a 360 panoramic view

5. 17th St. / SCAD/ Jackson St. Bridge -- Midtown -- Subjects: long exposure, cityscape, night cityscape
         ** FYI: found info. on flickr that Atlantic Station & SCAD security run ppl off those bridges**
"Hotlanta" by James Duckworth -- taken on the Jackson St. Bridge
http://www.flickr.com/photos/44124573@N00/2092105665/

6. Midtown Classics-- Skyline with Varsity in foreground // Fox Theatre // World of Coke // Centennial Park


My DIY camera/laptop bag

Maybe this is just because I'm a chick but has anyone else noticed that the camera/laptop bags out there don't leave alot to the imagination... Mostly all are black, backpack or sling, and everyone screams "STEAL ME OFF THIS ITTY BITTY GALS ARM- WHAT'S SHE GONNA DO ABOUT IT"

After searching online I got an idea (I didn't say it was original) & decided to make my own. Sort of.


I found a large purse at Kohls with dividers inside that felt durable and tough- the one I chose also happened to already have a laptop sleeve which made my project even easier. I even had durable upholstery fabric in the house leftover from my re-upholstering project a while back. So all I needed was some foam to pad and protect my gear and stitch witch to make assembly easier.

I probably tried 2 or three other designs including a cardboard box i was going to pad with foam but this one worked this best!

I had a hard time finding foam I was happy with- so much of it is low density foam... So I used the next best thing- craft foam (that stuff is super dense). I layered 3 pieces on top of one another, taped them together with gorilla tape, and slid them into my stitch witched pocket of fabric.

Then I folded it all in half and began sewing the ends and compartments together for my lenses and camera.

In the end I realized that the insert sort of looks like a shootsac, is nice and flexible, and is super padded. I am thinking about adding a top to this piece but that would make retrieval a bit harder.

It fit perfectly inside my purse (b/c I measured it like 10 times), is easily removable to any other bag I want, and I now have a bitchin, unique, totally me camera & laptop bag!!

**Sorry about the pic quality- these were taken with my cell phone**

Arts Arcata- September

We did it again & it was bigger & better than ever! Arts Arcata @ the DTA store that is...

First off, let me say that I was nervous for probably two days before the event. By the time everything got started I was so jacked up on adrenaline and serotonin from my anxious-ness that I was a hot mess all night!

We started the night off with DJ Psy-Fi (Miles) doin some dub step with Ethan scratching on the tables in the breaks, followed by a live & awesome performance from Never Die (Kyser-J & HiWay). Going on simultaneously was the Live Art Duel between Shiek and Wong- the theme the second time round seemed to be DTA/cartoons. We had a great turnout- even had ppl gathering outside on the sidewalk b/c we didn't have any room inside- and even sold quite a bit.

Of course, I am the 'official' picture taker for the store so I have been working on product placement in alot of my event pictures. Mostly just staying conscious of the items in the frame and background and trying to get a different perspective that might highlight the store, brand, or what have you. I think I'm getting good!


Had to get some action musical shots- of course with the DTA product placement!


I think this image will become a model for every event we have. Since we hung up these black logo boxes from the windows I have been utilizing them in my event photos as I can get a clear logo in the image and the whole store/crowd.

Not the best shot- not even a good shot really- but I had to take a pic of unurban samosas- this guy makes the samosas and delivers by bike- they are SOOO WONDERFUL! Keep an eye out for him in Arcata & at HSU...


Even more product placement- didn't mean to get so gun crazy but it's whats in stock until our holiday order arrives in the next month... 


This is one of my favorites- Triple product placement threat! Politicks shirt in the mirror (and yes, I planned it that way!) DTA on the right shirt down the side, DTA & guns on the paintings... Love it!

The finished product. Wong on the left with Foghorn Leghorn and Shiek on the right with Daffy Duck. My favorite and my personal winner is Wong- but maybe thats b/c I loved foghorn leghorn cartoons growing up!


Location: DTA store (1063 H St. Arcata, CA)
Date/Time: Friday, 9/10/10 from 6-9pm
Subject(s): art, people, crowd, music act, product placement
Notes: post processed in Iphoto

Just another day in Eureka....

The past week in Eureka has been gorgeous! We got a short taste of some summer heat and sun for a few lovely days but now the fog is rolling back in & with a thickness! Of course, this gorgeous weather has had me out and about with my camera on the ready almost every day. In the interest of time (because there is not even close to enough hours in the day anymore) I am combining all my Eureka images from the past week into one blog post with subtitles. Hope you enjoy!!

ST. BERNARD CHURCH'S FLOWER GARDEN
All controversy aside (the priest is being investigated for molestation), the St. Bernard's church has a beautiful (yet small) flower garden around the backside of the building (7th & I). This is such a tiny garden that I normally walk right past it in search of bigger and better gardens but that day I looked over from across the st. and saw so many colors I had to take a peek....
I noticed as I was going back through alot of these images that I am 100% guilty of leaving the camera on auto the whole time...  I was in a hurry b/c I had to get back to work, but NO EXCUSES- I need to stop doing the whole auto thing...

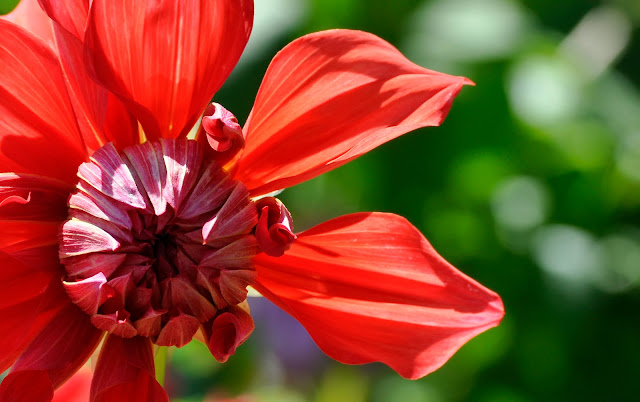
I saw this flower getting ready to open up and thought that the curled up red petals would look gorgeous against some green bokeh... I wanted to leave open space for the bokeh to balance out and make this image a little more simplistic than a closeup of such a intricate flower might create... 


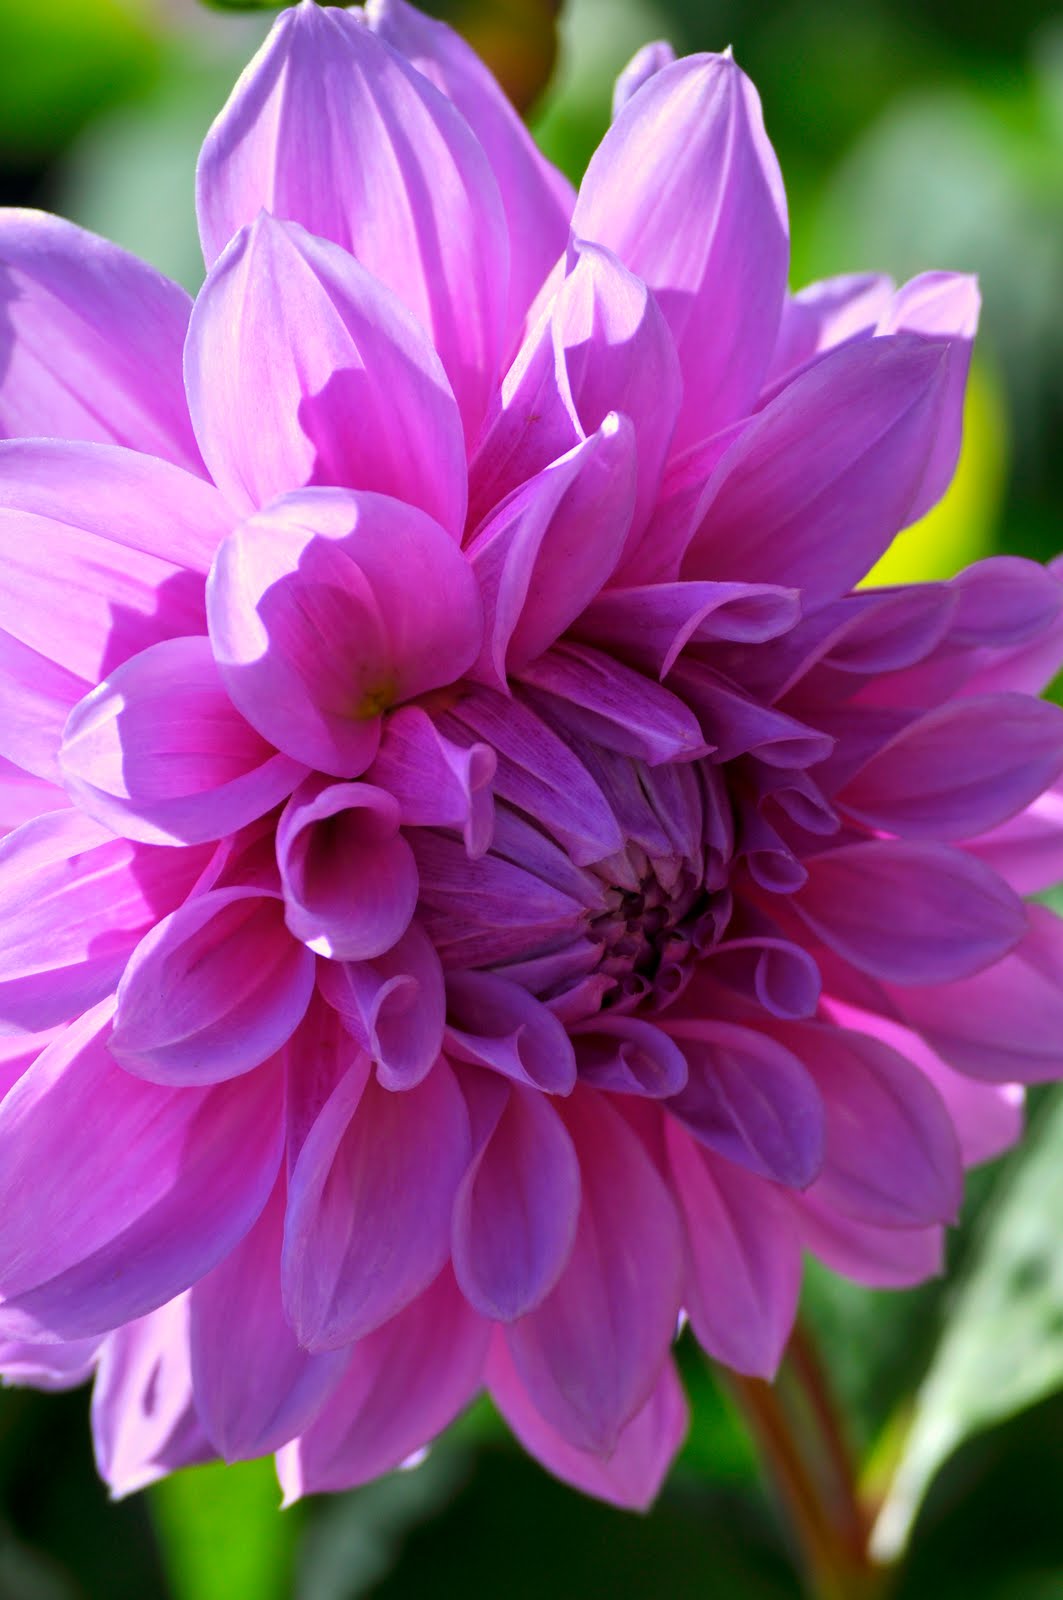
This flower is such a gorgeous pink- plus all the curled up petals forming the circle around the budding middle creates a nice concentric image...


I had a previous image of this plant but it didn't turn out the way I wanted. So I decided to give it another go- I was trying to focus on the texture of the leafs and trying to work in a shadow here or there....


Location: St. Bernard's Church (Corner of 7th & I Streets) in Eureka, CA
Date/Time: Friday. 9/10/10 at lunch
Subject(s): Flowers
Notes: post processed in picasa
------------------------------------------------------------------------------------------------------------


SEQUOIA PARK ZOO
Odly enough I have not been to the zoo a single time in the 2 1/2 years I have been living here. Ya, we've been to the park right next to the zoo too many times to count, but the zoo itself- NEVER. Part of the reason we haven't been to the zoo is b/c I basically grew up at the Atlanta zoo- which is HUGE and takes all day to experience- so I thought that the local zoo would be nothing but a disappointment. We got invited to a friends kid birthday party last weekend at the zoo- kinda odd to show up at a 5 yr old's birthday party when we don't have any kids, but what the heck.... We really wanted to see the zoo! Overall, I was really impressed. It didn't take long to go through the zoo but it was really clean & well manicured, the few exhibits were very nice, there were no crowds, and you could get pretty close to the animals. 

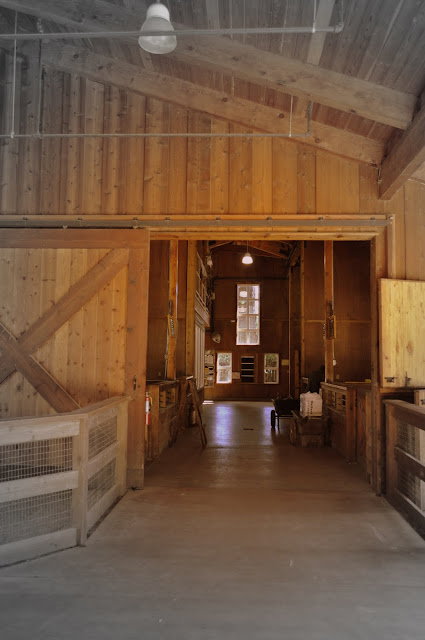
This is the barnyard animals exhibit at the zoo. The barn itself is very nice looking; so clean and shiny with the gorgeous blonde polished wood knotted siding. After playing around with this image I think the selective color tool was perfect as it helps bring out the warmth of the building as well as draws your eye through to the back of the barn to the window....

This little guy was all too cute! I stood in front of his window for quite a while trying to get him to look at me. Right when I was about to give up and leave he gave me what I wanted. I chose to crop this image square to help remove alot of the distracting background from the branches and other out of focus monkeys...


At the end of our zoo adventure we walked over to the bear cage- we were pretty disappointed as the only bear was sleeping but I did notice this cute fox sleeping in the redwood tree.... Again, I used a square crop to remove alot of the distracting leaves and branches from the frame. 


Location: Sequoia Park Zoo (3414 W St. Eureka, CA)
Date/Time: Sunday 9/5/10 at 11am
Subject(s): Animals, exhibits
Notes: polarizing filter used on all images, post processed in picasa
-------------------------------------------------------------------------------------------------------------

SEQUOIA PARK FLOWER GARDEN
I have been wanting to visit the small flower garden next to the zoo ever since I first drove by it. Combine that with the fact that I keep seeing awesome images from the garden on flickr from a guy named D. Swensen- he must live nearby & go early b/c he always has gorgeous dew shots and posts a new image almost daily. I finally got my man to take the pooch over to the garden and stand around bored while I take pictures (he's not really the flower garden type!)...


Location: Sequoia Park Flower Garden (3414 W Street Eureka, CA )
Date/Time: Sunday, 9/12/10 at 3pm
Subject(s): Flowers, Garden, Walkways
Notes: post processed in picasa

The Devil's Playground

Since the store has been open we keep hearing about this place behind Bayshore Mall called (dum dum dum) "THE DEVILS PLAYGROUND". Apparently this is where quite a few things happen:

1) where alot of the houseless people have set up their own group 'house'
2) where the good graf artists in this county put up their handiwork
3) where alot of the houseless people dump any and all trash (mattresses, food, needles, you name it, Devils Playground has it!)

So we HAD to go check it out. I couldn't believe that someplace like this was right down the street from me- I could walk there if I wanted to! Packed up the dog and the camera and less than 5 min later we are driving around the parking lot behind the mall looking for a trail.... POOF there it was!  A little hobo trail through the bushes to some forbidden location.... We walked through some bushes and trees and came out to quite a view:


My first reaction was "WHAT THE HELL- HOW DID WE NEVER SEE THIS BEFORE NOW!!! IT'S HUGE!!" Apparently this used to be a mill of some sort, according to local hearsay... We started walking around & finally found a way over the marshy creek over some old mattresses. 


And this was what we found inside the mill- this huge open space totally COVERED in graffiti... I especially love the Virgin Mary on the right and the Gas Mask guy on the left. How odd that they are on the same wall!


Then we saw these compartments off to the side of the larger open space... I am still working on product placement but this shot was a good one with the skulls & the RS Mean Streets Hoddie in the background....


The compartments I was talking about- we had to be careful where we stepped- underneath these walkways was nothing but trash & old scumy water...


And this is probably why ppl told us not to go beyond the "third compartment".... We could hear a few ppl behind the gate pushing buggies and doing God only knows what else... However, they made a pretty nice gate!

And this is the namesake- The Devils Playground....


It was lots of fun to explore this new place & I will definetly be going back for some RS/DTA photo shoot when we get some girls stuff in... Of course, with a man, a dog, a 4Runner, and some mace! =)


Location: Eureka, CA - behind bayshore mall
Date/Time: 8/15/10 @ 11am
Subject(s): urban decay, architecture, graffiti, trash
Notes: most of the images were taken with my polarizing filter on the lens as it was early morning and pretty bright out.

Ferndale Cemetery

Hooray for my first ever visit to the Ferndale Cemetery! Kinda morbid & creepy I know, but I just couldn't pass up seeing such an old cemetery- some graves date back to the early 1800's! We had to go to the fairgrounds to pickup my entries and arrived a little early so I thought the cemetery would be cool to stroll through (of course with my camera in tow!).

The entrance was pretty non-descript just a simple wrought iron archway behind a newer looking church.


I took this image on our way out rather than on the way in so it would be a little darker. I also added a warming tone over the image to make it appear more antique as well as film grain to help add to the antique feeling. 


This was the first mausoleum we saw as we came up over the top of the hill. I had to sneak a peak inside at that gorgeous stained glass window & boy am I glad I did as I really like the picture on the right of the inside with the light reflecting off the walls. 


As we neared the top of the cemetery I noticed this tiny angel statue in front of Mother Rainbow's grave (no joke!). It took some angling but I finally got the angel and the city in the same frame. I added a slight brown tint in post processing to get the antique-y apocalyptic feel... 


I saw these little round wall toppers as we were getting ready to leave. I really loved the shapes and textures of the balls- they looked like they had been there since the beginning. I'm sure they were gorgeous when they were new with that pretty pattern on the front. I really liked the way the balls lined up and the orange poppies and blue skies behind them also.... I played around with the focus on this set of images- focusing on the front for one image, then the second for another, and the last, etc... But this image with the shallow DOF (Depth of Field) came out the best. 


There were way to many unnamed headstones in the cemetery. There were also quite a few headstones that were anonymous to me- like these Mother and Daddy ones that were in a family plot. At first I didn't realize they were in a family plot & thought how sad it was that someone's mom & dad were buried so non-descriptly.... I thought it would make a good triptych (3 image set) so I compiled them together & got this...


The cemetery was great and it was nice to walk around outside on such a gorgeous day. I will have to go back & visit for each season to get some repetitive shots... =)


Location: Ferndale, CA Cemetery
Date/Time: 8/22/10 5-7pm
Subject(s): Flowers, landscapes, graves, statues
Notes: I took most of the images with my polarizing filter on the lens because even though it was 6ish in the afternoon it was still pretty darn bright out.

Humboldt County Fair

Whooo have I been busy! I finally made it to the fair this past weekend to see if I won any ribbons for my photography entries. Sadly, no ribbons for me this year =( but they did hang every one of my entries which is awesome considering they only have to hang 2!! So at least I am still moving in the right direction!

I was very surprised by the Judges picks this year. Last year I was able to locate tons of information on the Judges themselves which helped me tailor my entries to something more their 'style'. This year I couldn't even find out who the Judges were! Alot of the first and second place photos looked like snapshots to me, and there were quite a few photos that didn't place that I thought were better than the first place winner.

After my disappointment we went to check out the livestock and bird exhibits since we skipped those last year. I was really surprised at how large this part of the fair was & have decided that next year we will have to go for the judging....


This bird is absolutley crazy looking. I have no idea how he even flies with all those curly feathers... It was difficult to get an image of these birds without the bars from the cage getting in the way. But in the end I just changed my angle & voila! 


And this little chicken was so stunning- it looked as if someone had painted the edges of every single feather with black paint.... 

Then we took on the horse races for a few. We went up into the stands this year instead of bringing our own chairs & sitting next to the track. I was impressed by the view from the stands both of the track and the city. We bet on a few races & my picks won a whole $4 on my box trifecta bet.... YEAH! That paid for the beer I would have bought had we not snuck in a flask of good-ol Jack! =)


GET IT!!! Thats my horses- #5 & #4!! Pulling through for the win!

I had a great time at the fair this year but next year I am all about the rides & livestock shows!!! 

Location: Ferndale, CA Fairgrounds
Date/Time: 8/22/10 2-4pm
Subject(s): Fair, Carnivals, Racing, Exhibits, Animals
Notes:

DPS Assignment: Water in Motion

Yay for working toward my yearly goals! My first DPS Assignment for Aug. was a ton of fun- & VERY last minute! The assignment was "Water in Motion" and the idea was to capture water moving either through motion blur or through freezing the motion, although from my interpretation it seemed there was more emphasis on the motion blur aspect.

This assignment was perfectly in line with my yearly goals also of using and becoming familiar/comfy with long exposure images. In order to be able to get a long exposure without over-exposing I needed to get a filter that  darkened everything so I could take pics during the day (I'm busy as hell & need to be able to take the pics when I have time, not in that 2 hour golden window!). So I went out to Swanlund's Camera & picked up my first Neutral Density (or ND if your'e cool enough to know what that means) filter.

I did some research before I picked up the filter & found out all kinds of interesting things about these filters. First off, there are multiple purposes for a ND filter such as: smoothing out water, darkening a scene, smoothing out clouds, darkening skies, & general darkening so that longer exposures can be used. & there are a few different types of ND filters:
1) Graduated ND Filters (also called Cokin filters): these are rectangular glass filters that are clear on the bottom & gradually get darker & darker starting in the middle. These filters are attached to a round filter attachment which has multiple square slots for the filters & fits onto any size lens. The Graduated ND Cokin type filter system actually allows you to adjust the position of the filter, so you can create your own horizon line....
2) Screw-On ND Filters (Tiffen, or in my case Promaster): these are like normal filters, they are circular & screw onto your lens. The screw on ND filters come in two varieties, graduated (works similar to a circular polarizer so you can adjust your top/bottom but not your horizon line), and full (what I purchased, all one even gray tone).

Surprisingly I couldn't find any info. on my Promaster filter except that it may be an off-brand of Tiffen. Unfortunatley for me the local camera store only carries promaster!!

So I got the filter & set out for a waterfall to both use my new toy & get an image to enter in the weekly assignment. First thing I realized is that my 2x filter is not even close to what I need to take pics around the middle of the day. It works great in the forest around late afternoon & I got up to 6sec. exposures before my images became too bright (that's stacking my ND2x with my Polarizer, both of which block the same amount of light). But in full sun & even overcast conditions I would need to stack with another stronger ND filter. Oh, well, Live & Learn!!!

I had a great time shooting this waterfall & have been wanting some decent pics of it for quite a while....

First, my ENTRY for the DPS Weekly Assignment:


I took this pic as an after thought. I was getting ready to leave when I thought I should climb up a stump & try to get a pic of this spout. It was pretty scary though b/c I had to setup my tripod in a few inches of water.... EEEKK!!! 


Now, all the other good pics:


This picture was okay but really pop'd out at me after I boosted the color & gave it a yellow tint....

Water in Motion 11


I love this image, from the dark shadows around the edges of the pool to the pure milky white of the waterfall,  & the little swirling action on the left is really nice.


I had to climb under the waterfall/table fixture to get this image. I forgot I was wearing khaki's & got pretty dirty (it was the khaki's or the camera, I think I choose well!). But, I ended up with a pretty neat almost abstract looking picture. I boosted the color & made it B&W b/c color was really distracting with all the trees & leaves in the background. 


Location: Sequoia Park -- Eureka, CA
Date/Time: Tues. 8/3/10 @ 6pm
Subject(s): Water, motion blur
Notes: Filters Used: stacking ND2x & Circular Polarizer; minimal editing, mostly saturation, curves, & exposures...

Step 3 of the Humboldt County Fair

My fair exhibits are due tomorrow & I feel uber-prepared! I got my prints made at Costco again- the only place in town to get prints made (EVERYONE else send them off). Last year I paid Michael's to custom mat my images & it was super pricey and they didn't even give me backings to the mats. So this time round I decided to do it myself & was pleasantly surprised at how easy it was. 

Once I had my prints, most in 8x10 but I have two images in 8x12, I took them to Michael's pre-cut mat section. I had to lay them all out on their counter trying to pair up images with mats. It was so hard to decide what colors to go with!! Then I bought 3 sheets of 1/4" white foam board & permanent foam square stickies... 

Pre-cut Mats= $4 each (I got 6)
Foam Core= $2 each (got 3)
Stickies= $2 (got 2)
Prints= $2 each (got 6)

So my total cost for this project was $46! I spent that much last year on getting just half of my images mated!! YEAH! 
Once I got home I went to work, drawing the mat sizes on the foam core & cutting it out. It was difficult to get the foamcore the same size as the mat so I just made it a 1/4 inch smaller all the way around. I figured it's better to not see it than too see loose pieces sticking out the side... 


Then I opened up the pre-cut mats, and put the permanent stickies on the corners and on the long sides....
Disclaimer- Once this is all put together it will be permanent. If I later want to change anything like my image, I have to start over with a new backing and mats b/c the stickies will not come off without ripping. 


Then I put stickies on the back corners of my image and the corners of the backing, layered everything (from the top: lavender show mat, white inset mat, image, backing). So simple!! Here is what the first entry looked like when I was finished:


                                   View from the front                               View from the side

So my entries are now ready to head down to the fair!! I am super excited about this year's competition & keeping my fingers crossed for my first blue ribbon. This is my second competition so I only have 1 more competition before I can enter my images into the professional category- where the competition is fierce but the prizes are soo much better.

I will take some pics of everything finished and matted tonight before I take them off to the fair entry table tomorrow morning!! 

2010 Year End Goals

Ok, I know my timing is waaay off on this one but I had priorities in Jan. and bigger fish to fry than improving my photography. I was reminded by DPS that we are now halfway through the year, and I have STILL not set any photography goals for myself!
SEE Blog Post: How are you doing with your goals?
So I decided to take a min. to set some goals for myself, keeping in mind how busy I can be sometimes with the store and work....

One goal was set a few months back, and it was a small one but still a step in the right direction:

1) Participate in DPS weekly Assignments at least twice a month!!
          <<How am I doing? Well, I entered quite a few (Still Life & Fences in May; Dutch Angle & Low Angle in June; and MidDay Portraits so far in July), haven't won any yet but have noticed that my thought process is improving with each session. How to setup, things to try, lighting, subjects, and overall my level of comfort & confidence.>>

So I need to set a few more that I can meet by the end of the year:

2) Challenge myself with Flash Lighting (& purchase an exterior flash)
        <>

3) Learn about Long Exposure & Challenge it's usages
        <>

4) Plan a monthly calendar for next year & Give away monthly desktop calendar's
      <>

5) Follow a top Pro Photographers Blog
     <Scott Kelby's Blog but it is more geared toward post-processing with Photoshop, but I don't even have Photoshop so most of it isn't too helpful. I have also been following a semi-local pro landscape photographers blog, Jeff Sullivan. His blog is more what I am looking for however I would love to find someone with portraits, macro's, and landscapes which is what interests me the most.>>

DPS Assignment: Mid-day Portraits

I have been meeting my goal of participating in at least 2 DPS weekly Assignments- WOOT!! It can be kinda hard to find time with the craziness of now being a business owner and still working full-time at the law firm. As much as I wanted to participate in this week's assignment- LOW ANGLE- it is a technique I use alot and feel that I challenge myself on almost every photo session I do- Simply put I LOVE the low angle perspective. 


The upcoming assignment for DPS forums is Portraits, but not just any portrait- MID-DAY PORTRAITS. Why mid-day you ask? Well, the sun is brightest at midday which can make for some extremely unflattering and washed out pictures, making assignment tougher. To top it, this assignment had a few extra rules- it had to be a mid-day portrait using at least one of 3 techniques discussed in a blog post (http://digital-photography-school.com/3-tips-for-shooting-portraits-in-bright-sunshine) :

1) Find Shade- I both found shade under a tree and created shade using a large white floppy hat

2) Use a fill-flash- I used fill-flash on a few images and was pleasantly surprised- I would have never thought to use flash on a bright sunny day at 3 in the afternoon!

3) Use a reflector- I skipped this one- hey I used one more that I had too already & we were technically trespassing :)

We went up to Kneeland with my friend Buda (my pretty model) & the dog. I have been wanting to shoot in Kneeland for quite a while but never have the time or drive to make it up there. So I decided to do the portrait shoot up there thinking the scenery would be prefect & make for some awesome images- I was right!! We stopped at the schoolhouse & the adjacent field/barn for these images:

The first thing I went for @ the school- THE SWINGS!!! It has been forever since I have been on a swing & it felt great! It also felt a little dreamy, swings generally remind me of elementary school. I wanted to re-create my dreamy feeling in the image so I left the model a little blurry as if she too were dreaming. I love the way the light is hitting her, illuminating the edges & making her almost glow.


I really love this image also- I wanted to try and be more creative by keeping the subject out of focus and picking another focus area- in this case the flowers at the bottom of the frame. Practicing the whole "give your subject space to look into" thing!!


I took this image as an after-thought. I really loved the barn in front of her and the grass in the field. I processed this image quite a bit to get the right antique feel to it- I used saturation, antique effect, and highlights to make the grass stand out & look sun-kissed. 


 I was trying to vary my shots between vertical & horizontal. I post-processed this image mostly using the saturation & highlights tools. 


And last but not least- my entry for the assignment! No. 1 thing I learned about field portraits- be prepared to do some grass pullin! There was a ton of grass between her face & the camera I had to pull up to get a clear shot. I really love the play between the shadows created by the hat & the light of my fill-flash- It illuminated my model just enough without overexposing the rest of the image. I also was very happy with the lines created  toward the top of the image from the hat folds & the rolling hill in the background. 


This assignment made me sooo friggin nervous you can't believe! I can't image having someone pay me for portraits- what happens if they all turn out shitty? Even without any pressure from my model or for specific results it was still pretty crazy for me. I think I kept my mouth shut the entire time & didn't give Buda any directions on how to pose other than the occasional "sit there" or "lay here". Thank god she is such a great friend & model- it just came naturally to her! Next time I need to just get over the nerves & communicate- without such a great friend & sport this session could have turned out quite badly!! THANKS BUDA!!!

Location: Kneeland, CA by the Schoolhouse
Date/Time: 6/20/10 @ 3pm
Subject(s): Portraits
Notes: All images post-processed in IPhoto adjusting definition, highlights, saturation, and sharpness.

Followers